We RVers love to share modifications we've done to our vehicles to make they fit our personal style. So it is with delight that a share a series of photos that show some very unique customizations done by blog reader Alan Shafer from Rockford, MI to his Roadtrek 2006 RS Adventurous.
Here's Alan's account, followed by the photos.
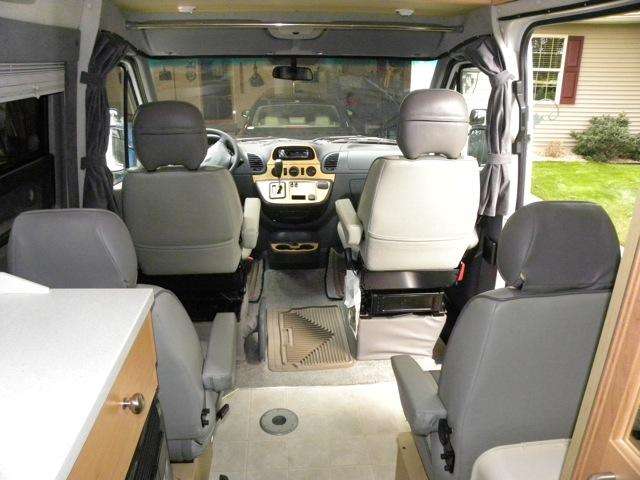
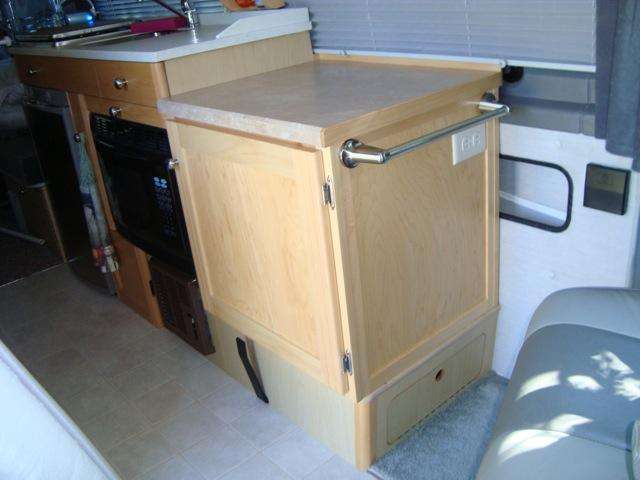
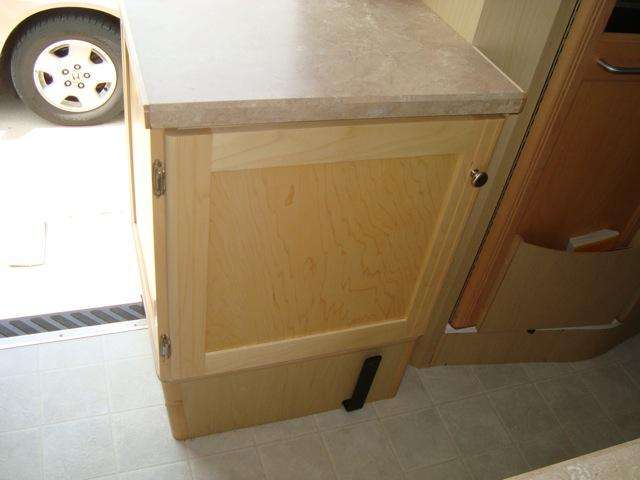
As you can see by the pics, it had four captain's chairs. I removed the rear chairs and started from there. I have detailed pics of the whole process. The good thing is that I did not drill any new holes in the existing cabinets, etc. when doing the cabinets. I used all existing holes. The cabinets are made of 1×2 and 1×3 solid maple for the rails and stiles. The sides and doors are recessed panels made with maple veneer 1/4″ plywood. There was no stain used. They were finished with satin finish polyurathane. (Minwax)
I was able to get a towel bar and electrical outlet on the side of the cabinet on the driver's side. (Again, no new holes made in the existing cabinetry.) I also still have access to the storage area under where the seat on the driver's side was located. The reason for not wanting to not make any new holes was that if we should decide to sell this Roadtrek down the line, I wanted to be able to put everything back to original in case the new buyer would want the van the original way it was. This can be accomplished in less that two hours. . . . maybe less.
As for the screens, I made a frame for the screen which is mounted above the cabinet on the passenger side to cover that part of the door area. The rest is a magnetic closing screen (Magna Screen) that was purchased at Menards. The sides are held in place with self-adhesive and sew on velcro. The top is held in place by a dowel rod used as a curtain rod. To add some weight to the bottom of the panels, I did use lead weighted rope purchased at local fabric stores. (Field's Fabrics) (Joann's Fabrics)
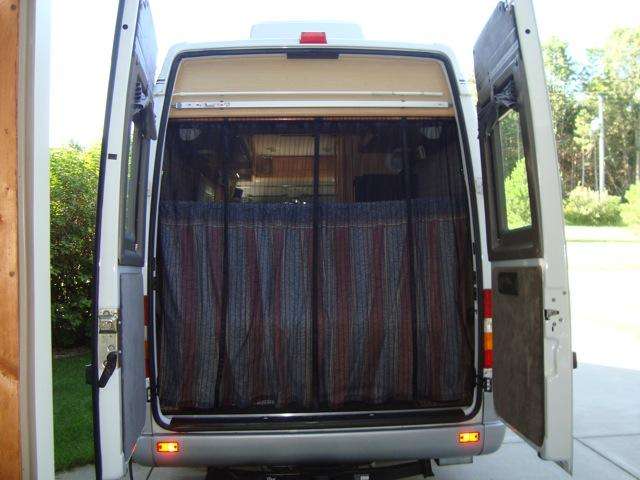
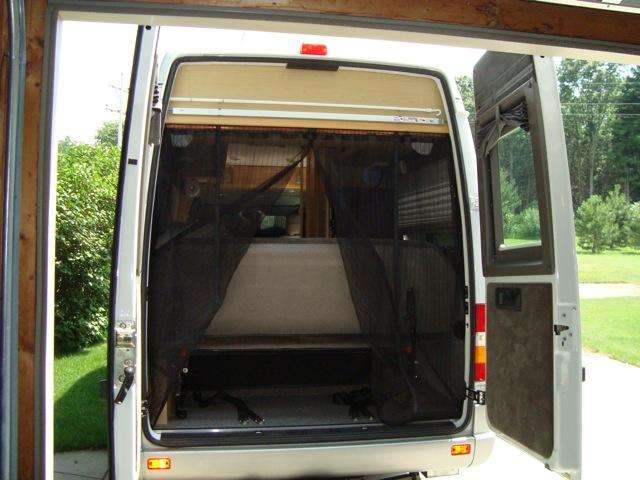
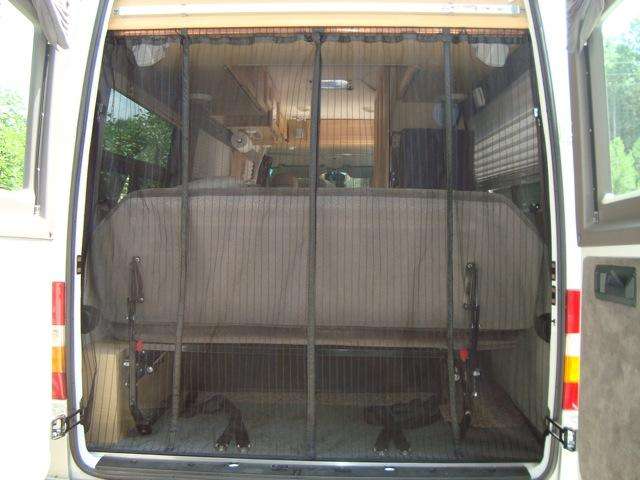
For the rear doors, I purchased two additional Magna Screens. This gave me four panels. I removed the magnets and sewed the panels together where the magnets were originally located. This gave me two panels. Then with self-adhesive and sew on velcro, I finished the project. I did loosen (or remove) some of the interior trim panels so the velcro along the sides would be hidden and also have the panels over the velcro to hold better.
For all of the screens, I did have to sew a pocket at the top to go over the “curtain rods”. I also did have to shorten all of the panels and sew on a hem made from bias tape from the local fabric store.
I'm sure if you have questions or comments, Alan would welcome them. Post under comments below.
Here are his photos:




UPDATE
Additional note from Alan, responding to request for another details on side screen:
regarding the screening for the side slider door.
A couple of things came to mind as I was taking these additional photos as some have requested. The first is that without the cabinet and wood framed screen I built, much of this information would not work. However, I will provide what details I can. If you have specific questions, let me know.
Whatever you decide to do, you have to keep in mind that nothing is really square. Also, you have to keep in mind where you place the dowel rod at the top so you can still use the sliding curtain (Photo 7). You also have to have a place to anchor the rod. I was able to use the wood frame of the screen and the 1×2 at the top I used to relocate the slide for the curtain (Photo 6). I wanted minimum new holes in the original interior. I didn’t have any with the cabinets.
The pocket at the top for the rod was made from cutting off the bottom hem of the screens and sewing it to the top hem allowing enough space for the rod to fit through.
As I mentioned earlier, I did remove the beige door trim to be able to put the self-adhesive Velcro on the metal and attach the “sewn on” Velcro to it. Then when I reattached the panel with the snap screws, it held it in place securely. I didn’t want to rely on the adhesive holding the Velcro in place after all the time I spent. I did sew on Velcro on any of the seams I could. I also did sew the two panels together at the top to keep them from separating ).
Of course the screen material was still too long so I went to the fabric store and bought some 7/8” double fold quilting bias tape to use for the hem after cutting the screening to length. To hold the hem down, I used what they call weighted rope, which I inserted after making the hem but before sewing the ends. I used two sections in each panel.
In closing, I have to tell you doing this was very time consuming. I probably had that dowel rod up and down five or six times doing the measuring, figuring out what to do next, and how to make it work. I just did not want to stick something up with self-adhesive Velcro and have to keep re-doing it over and over. Plus, I wanted something that looked fairly attractive, as well as, serving the purpose of keeping the bugs out.
Hope this helps. If I can figure out how to communicate with individuals who may have specific questions via e-mail or the roadtreking forum, I would like that.
21 Responses to “Cool mods to a Roadtrek: Screens and cabinets”
Comments are closed.


June 09, 2014at10:38 pm, Kathleen Darrow Constant said:
Hey, Tim Bucher, hate to break it to you, but the name, “palmetto bug” is a euphemism. From a South
Carolinian who also lived in south Florida for two years, that’s just a plain ole’ cock roach!
June 09, 2014at1:41 pm, Ginny Dugan Evans said:
Nice!
June 09, 2014at10:04 am, Jolie Youngblood Rickman said:
Magic mesh…..is great stuff!
Easy DIY project as well.
June 09, 2014at8:28 am, Mary Ellen Seguin said:
Cool
June 09, 2014at7:07 am, Dennis Bergeron said:
Great work! Thanks for sharing.
June 09, 2014at1:12 am, John Armin Naylor said:
John Allen Naylor
June 08, 2014at11:43 pm, Jim Hammill said:
Answering an earlier point, Roadtrek has been designing and offering screen packages since the beggining of time :):). Never as swum that what you are seeing out in the field is the only things we offer. :):) screens are awesome things and I love seeing how others do them as well!
June 08, 2014at10:43 pm, Tim Bucher said:
When you are down south how do you control palmetto bugs from getting in. Just found one in the roadtrek after spending some time in Florida..
June 08, 2014at10:31 pm, Claudia Sherrill said:
We had screens made for our 95 Roadtrek 190. The back door and side door were Velcro mounted and the front doors were aluminum framed and were held in place by rolling up the windows to the frames. Made camping at the beach or in the woods a lot more pleasant! And less buggy!
June 08, 2014at9:35 pm, Anthony Prendergast said:
Are these screens an option from Roadtrek?
June 08, 2014at8:54 pm, Trisha Holderfield said:
I wanna be ROADtreking
September 08, 2013at5:47 am, Rachel said:
I wish Roadtrek would incorporate these screens into the design. Both Leisure Travel and Great West Vans have these screens, and that gives them a definite plus. I have a cat I will be traveling with, who is not as well behaved as Mike’s. I need to be able to screen off the openings!
July 20, 2013at7:41 pm, Alan said:
The dowel rod above the sliding door on the side was anchored to the framework for the screen above the cabinet. You probably do not have the cabinet making it had to make a framed screen like I did.
The dowel above the rear doors is anchored into the overhead cabinet at the rear of the motorhome. I used a screw at each end. Again, if you don’t have the cabinet, this won’t work either. Maybe you can find something to anchor it to.
July 21, 2013at12:18 am, Vicky Bennett said:
Thanks, that was helpful. I will check our RT out further when we get it back from the dealer who is making a repair that was missed prior to our purchase, but I believe wood is available over both locations. There is already Velcro placed that I believe will work, just have to make the net curtains.
July 20, 2013at7:24 pm, Vicky Bennett said:
Am very interested in screening our 2008 210 Popular. Question I have is how did you mount the dowels at the top?
July 16, 2013at7:09 pm, Debbie Broadstreet said:
Please post more pictures of the side door screen panels – inside and outside. (showing details of how it was installed. Thanks!!!!
July 17, 2013at9:59 am, Alan said:
Not sure how to post the pics. I sent what got posted to Mike Wendland and he did the rest. Once I figure out how to do the posting or figure out if there is any way to communicate directly with someone via email I will try to post more pics and details.
July 16, 2013at2:44 pm, Cheryl Gregorie said:
Beautiful work!! I did the same screen on my 09 Adventurous using a tension shower rod. The problem I have is the tape including Velcro comes loose. What Velcro brand and type did you use? I tried monkey tape, poster board tape to name a few. Oh yeah, red automotive double sided tape too… After a few weeks it would unstick. 🙁
July 16, 2013at5:07 pm, Alan said:
I got the velcro at Fields Fabric Store here in Grand Rapids. I used the sew on velcro and sewed it onto the screen panels. At least that will not come loose.
On the rear doors, I did manage to get the velcro behind the trim and wall panels to help hold the stick on velcro I used there.
On the side slider, on the side toward the front of the motorhome, again, I removed the trim panel and after attaching the stick on velcro to the motorhome metal body, I replaced the panel over it. On the side toward the back, I did use the stick on but have a screw at the top and one at the bottom for now. Those screws go into the cabinet and screen frame I made. I can add more screws if needed.
Good luck.
July 16, 2013at9:02 am, Pam Hicks said:
That is BEAUTIFUL & meticulous work, Alan!
July 16, 2013at7:51 am, Laura H Postema said:
I love reading about what others do to modify their RTs. I like Alan’s screens and will now look into making some for our RT.
thanks.